A solid workbench is the single most useful upgrade a homeowner can make to their garage or basement. Here’s how to build one — even if you’ve never built anything before — using under $80 of materials and a single Saturday.
There’s a moment in every homeowner’s life where they stop pretending the dining table is a workbench.
You’ve held a wobbly piece of wood with one hand and tried to drill it with the other. You’ve laid a board across two sawhorses and felt it bow when you applied any real pressure. You’ve used the floor of the garage as a work surface and ended up with paint on the concrete and a sore back.
The fix is not complicated. The fix is a real workbench, and you can build one in a single weekend, with five pieces of 2×4 lumber, one piece of plywood, and a small bag of screws.
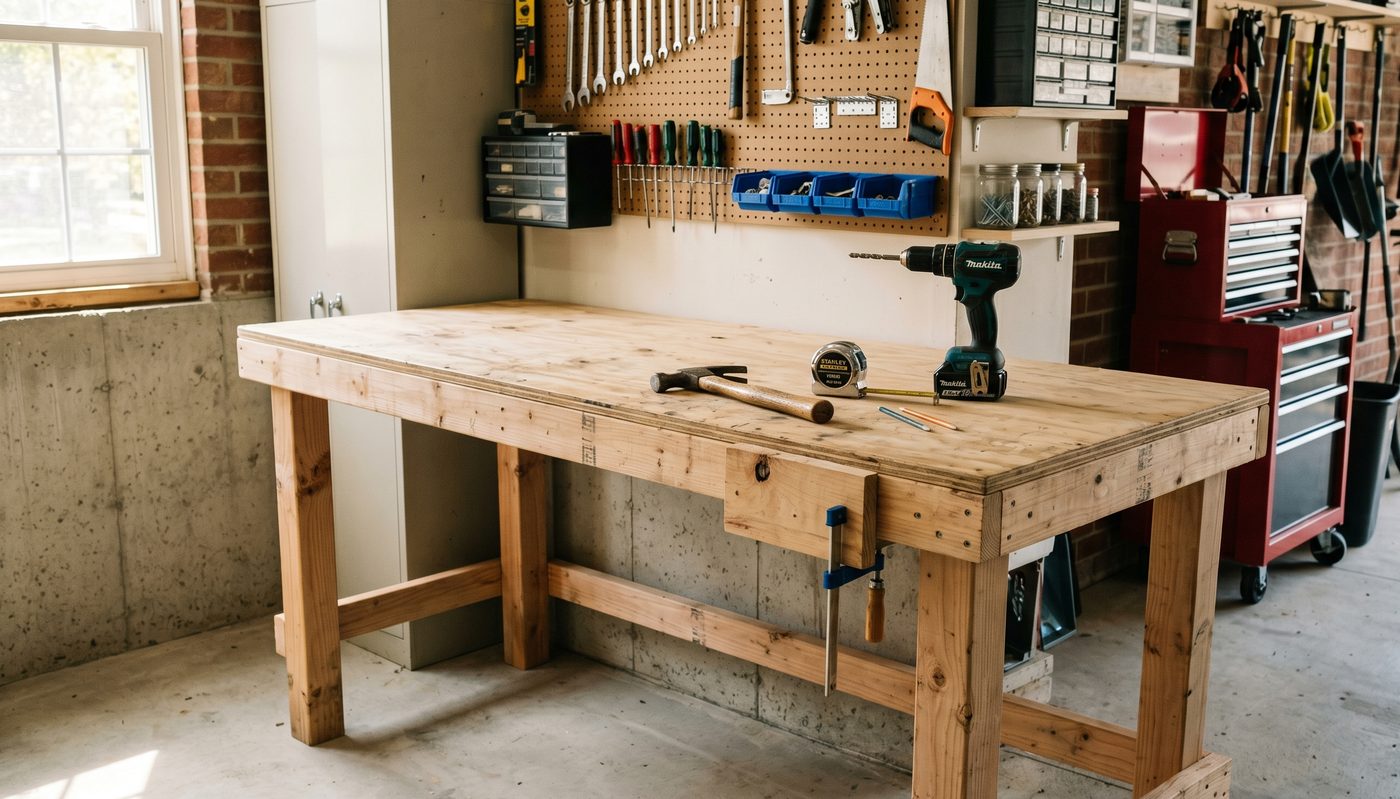
This article walks you through it. The bench we’ll build is 6 feet long, 2 feet deep, and 36 inches tall — the standard size that fits in nearly any garage and works for nearly any project. Total cost in materials: around $75. Total build time: around 4 hours, including coffee breaks.
Why a Workbench Changes Everything
Before we get into the cuts, here’s what most people don’t realize: a workbench is not a luxury for serious woodworkers. It’s the basic infrastructure of household ability.
Once you have a flat, sturdy, dedicated work surface in your garage or basement, every other project gets dramatically easier:
- Repairing a broken kitchen drawer takes 20 minutes instead of 60
- Assembling a bookshelf or bed frame is no longer a kitchen-floor wrestling match
- Mounting hardware on doors, gates, or fences becomes routine
- Garden projects (planters, raised beds, birdhouses) suddenly feel achievable
- Your kids have a place to do their own first projects
And the workbench is also the gateway project. The first thing most people build successfully. The thing that proves to themselves that they can, in fact, build things.
If you’ve never built anything in your life, build this first. Everything that comes after gets easier.
The Materials List
Here’s exactly what you need. We’re going to keep this simple.
Lumber (most home improvement stores cut this for you, free)
- (4) 2×4 boards, 8 feet long — these will become the four legs and the long frame pieces
- (2) 2×4 boards, 4 feet long — these will become the short frame pieces
- (1) sheet of 3/4″ plywood, 2 feet × 6 feet — this will become the top surface
Hardware
- (1) box of 3-inch wood screws — you’ll use roughly 32 of them
- (1) box of 1-1/2 inch wood screws — for attaching the plywood top
Optional (recommended)
- A small can of clear polyurethane — to seal the wood top so spills don’t soak in
- Four leveling feet or rubber pads — to keep the bench from sliding
- Two simple shelf brackets — to add a lower shelf later, when you want one
Tools you need
- Measuring tape
- Pencil
- Cordless drill (or a manual screwdriver if you have time and patience)
- A square (any small square will do)
- A small saw — if your lumber yard didn’t pre-cut to length
That’s it. No power saw needed if the store cuts the lumber for you. No specialty tools.
Total budget: $65–$85 depending on lumber prices in your area.
Step 1: Get the Lumber Cut
This is the trick most beginners don’t know about: Home Depot, Lowe’s, and most local lumber yards will cut your boards to the exact lengths you need, for free or for a couple of dollars per cut.
Walk in with the following list and ask the lumber department to cut for you:
From the four 8-foot 2×4s:
- Cut two of them into 2 boards each, 6 feet long (these are the long frame pieces — top and bottom)
- Cut the other two into 4 boards, 33 inches long (these are the four legs)
Actually, let me re-state this clearly:
| You need | How to get it from 8′ boards |
|---|---|
| 4 legs at 33″ each | Cut two 8′ boards into four pieces of 33″ (waste: about 33″ of scrap each) |
| 2 long top rails at 72″ | Cut two more 8′ boards down to 6 feet (waste: 2 feet each, save for shelf later) |
From the two 4-foot 2×4s:
- Cut into 4 boards at 21 inches each (these are the short cross-pieces between the legs)
That gives you:
- 4 legs, 33″ tall (gives you a bench surface around 36″ with the plywood on top — comfortable standing height for most adults)
- 2 long rails, 72″ (six feet)
- 4 short rails, 21″
From the plywood:
- Already 2′ × 6′ (which is the bench top). No cuts needed.
If your store can’t cut all of these, take a small saw and a tape measure home. The cuts are simple and forgiving.
Step 2: Build the Two Side Frames
The workbench is essentially a rectangular box made of two identical end frames (each made of two legs and two short rails) connected by two long rails.
Start by building one end frame. Then build the other identical to it.
Each end frame consists of:
- 2 legs (33″)
- 2 short rails (21″)
The short rails connect the two legs — one near the top, one near the bottom. The result looks like a tall, skinny rectangle.
Position the bottom rail about 4 inches up from the bottom (this gives the legs some “kick” so the bench is stable). Position the top rail right at the top of the legs (the rail’s top edge flush with the top of the legs).
Attach with 3-inch screws. Drill pilot holes first to prevent the wood from splitting — pre-drilling is the difference between a clean joint and a board that splits in half on you.
Rule of thumb: two screws per joint. Drive them at slightly different angles so they “lock” the joint. Don’t over-tighten — wood is forgiving but it cracks if you crank too hard.
Repeat for the second end frame. You now have two identical rectangles.
Step 3: Connect the Two Frames
Stand both end frames upright, parallel to each other, six feet apart.
The two long 6-foot rails will connect them — one at the top, running along the upper edge of the end frames, and one at the bottom (you can also skip the lower rail if you want, but it makes the bench much more rigid).
Have a friend or family member help here. This is the only step where two people make life dramatically easier — one person holds a frame upright while the other lines up and screws in the long rail. Alone, it’s possible but frustrating.
Position the long top rail flush with the top of the end frames. Drive 3-inch screws through the rail into the legs at each end. Two screws per side.
Repeat with the long bottom rail, positioning it at the same height as the bottom rails of the end frames.
You now have a complete workbench frame — a rectangular box with four legs.
Stand back. Push it side to side. It should feel solid. If it wobbles, check your screws and re-tighten anything that backed out. If it’s still wobbly, add a diagonal brace from one corner to another (any scrap 2×4 will do).
Step 4: Attach the Top
Lay your plywood sheet on top of the frame. It should fit perfectly — 2 feet wide, 6 feet long, sitting flush on the long top rails of the frame.
Drive the 1-1/2 inch screws down through the plywood into the top rails of the frame. Space them about every 12 inches along each long rail. About 12-14 screws total.
Done. You have a workbench.
Step 5: Sealing and Finishing (Optional, Recommended)
The bench works perfectly fine bare. But if you want it to last 30 years instead of 15, take 20 minutes to:
- Sand the top smooth with 120-grit sandpaper. Just enough to remove splinters and rough edges.
- Apply two coats of clear polyurethane to the top. Let dry between coats. This seals the wood from spills, oil, and moisture.
- Add rubber feet or leveling pads to the bottom of the four legs. This keeps the bench from sliding and protects your garage floor.
The whole sealing process adds maybe 25 minutes to the total build time. Worth it.
Step 6 (Later): The Lower Shelf
Once you’ve used the bench for a few weeks and know how you’ll be storing things underneath, you’ll probably want a lower shelf spanning between the two bottom rails.
This is dead simple: cut one piece of plywood (or two boards laid side-by-side) to the inner dimensions of the lower frame, and screw it down. Five minutes of work, and you’ve doubled your storage.
We recommend waiting on this until you’ve been using the bench for a month — you’ll have a much better sense of where you actually want the shelf positioned.
Common First-Time Mistakes
Skipping pilot holes. The single most common reason a project goes wrong. 2×4 lumber splits very easily near the ends. Always pre-drill before driving a screw within 2 inches of a board’s end.
Buying the wrong screws. Get 3-inch screws for the frame, not deck screws or drywall screws. Deck screws have heads that strip easily. Drywall screws snap under pressure. Standard exterior wood screws are what you want — labeled “wood screw” or “all-purpose construction screw” at any hardware store.
Building it in a tight space. The frame, when complete, is 6 feet long and 2 feet wide. Make sure you have room to assemble it in your garage or driveway with maneuverability around all sides. Tight assembly is frustrating.
Working alone for Step 3. As noted, get help connecting the two end frames. Alone, you’ll spend 20 minutes wrestling with two upright rectangles and zero progress.
Trying to make it look perfect. This is a workbench. It’s going to get scratched, dented, painted, and stained. The first day you use it, it stops being pretty. Don’t waste time obsessing over an eighth-of-an-inch gap. Get it solid and use it.
What Comes After
Once you have a workbench, you have infrastructure. The next obvious projects open up:
- Garden raised beds
- Outdoor benches and tables
- Repairs and refinishes around the house that you’d been avoiding
- Birdhouses, planter boxes, simple shelves
- A garden gate, a fence panel, a chicken coop
- And eventually — if you go further — a real outbuilding for storage
If you’re starting to think about that first real outbuilding, our review of a father-son shed-building project that worked for first-time builders is worth reading. Same general philosophy as this workbench — clear plan, real lumber, single weekend, finished structure. Just bigger.
One Last Thing
A workbench is one of those purchases that feels small at the time and turns out to matter for the next decade.
Every household repair you do for the next ten years will be easier because you took one Saturday in 2026 to build this. Every project your kids do — first birdhouses, school projects, “let’s fix this together” Sunday afternoons — will happen on this surface. Every guest who walks into your garage will see a real workspace instead of a junk-pile.
It costs $75 and a Saturday. Almost nothing in your life will return more value per dollar than this single weekend project.
Build it. Then build whatever comes next.
Prepared Family Press publishes practical guides for American homeowners. We believe a working household needs working infrastructure — and that the most important infrastructure usually starts with a single, sturdy bench.
1 thought on “How to Build a Simple Workbench in One Weekend”
Comments are closed.