The five small skills that, between them, handle most of the calls a typical homeowner makes to a handyman every year. Each takes under an hour to learn and saves hundreds of dollars over the life of a house.
There’s a quiet skill gap in American homeownership that doesn’t get discussed enough.
A generation ago, most homeowners knew how to handle the small things that go wrong in a house — a dripping faucet, a running toilet, a sticky door. These weren’t impressive feats of craftsmanship. They were ordinary household maintenance, the kind of thing a homeowner just did on a Saturday morning between errands.
Today, most homeowners pick up the phone instead. Not because the jobs are harder — they’re not — but because nobody ever showed them how, and the YouTube rabbit hole feels intimidating when you don’t know where to start.
This is the starter list. Five repairs that, between them, account for maybe seventy percent of all the small jobs the average homeowner ever needs. Each of them is genuinely simple. Each takes under an hour to learn. Each saves you somewhere between $80 and $250 every time it comes up.
1. Fixing a Dripping Faucet
Why it matters: A single dripping faucet wastes about 2,000 gallons of water per year, plus quietly increases your water bill. Most homeowners ignore it for months because they assume the fix is complicated. It almost never is.
What’s actually wrong: In nine out of ten cases, the drip is caused by a worn rubber washer or O-ring inside the faucet handle. These cost about a dollar at any hardware store. The “skill” is just opening up the handle and replacing them.
The basic process:
- Turn off the water supply under the sink (two small valves, one for hot, one for cold).
- Remove the handle — usually one screw under a decorative cap.
- Pull out the cartridge or stem beneath the handle.
- Replace the washer and O-rings at the bottom of the cartridge.
- Reassemble in reverse order and turn the water back on.
Time: About 30 minutes the first time, 10 minutes once you’ve done it.
Tools needed: A screwdriver, sometimes pliers. That’s it.
A plumber charges $90-150 for the same job.
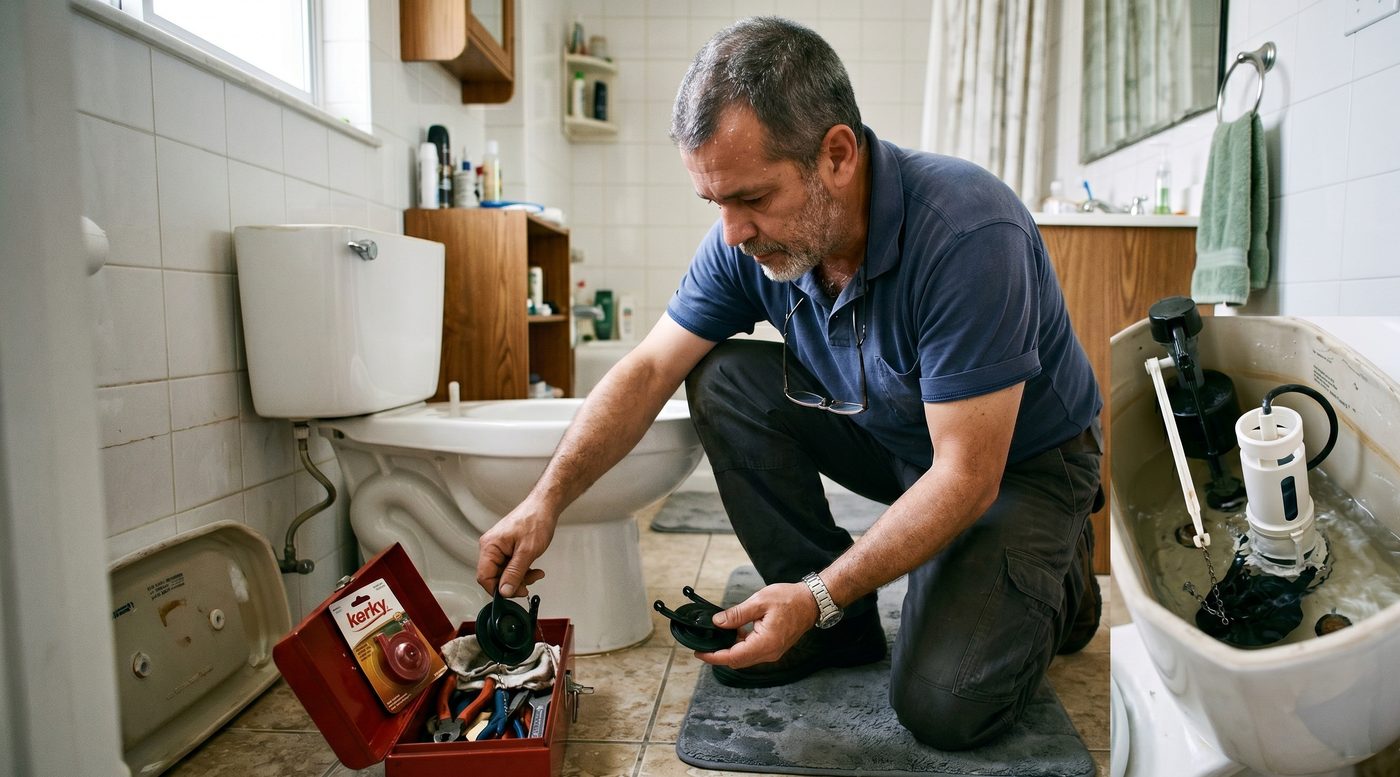
2. Stopping a Running Toilet
Why it matters: A toilet that “runs” — meaning water keeps trickling into the bowl after you flush — wastes between 20 and 200 gallons per day. It’s the single biggest hidden cost in many American homes, and almost everyone has lived with one.
What’s actually wrong: Inside the toilet tank are two main parts: a flapper (the rubber piece that lifts when you flush, then seals) and a fill valve (which refills the tank). If the toilet runs constantly, one of these is failing. Both cost under $15 at any hardware store, and modern replacement kits are sold as a complete swap.
The basic process:
- Take the lid off the tank and look inside.
- Identify whether the flapper isn’t sealing (water keeps draining into the bowl) or the fill valve isn’t shutting off (water keeps flowing into the tank).
- Turn off the water supply to the toilet (small valve on the wall behind it).
- Flush to empty the tank.
- Replace the failing part using the new kit’s instructions (usually 4-5 steps).
Time: 45 minutes the first time, 20 minutes after.
Tools needed: A small adjustable wrench and possibly a sponge to soak up residual water. That’s it.
A plumber charges $120-200 for this.
3. Patching a Hole in Drywall
Why it matters: Doorknobs leave dents. Kids leave dents. Furniture leaves dents. Every house gets drywall holes, and most homeowners either ignore them for years or pay a handyman $80-120 per hole.
What’s actually wrong: Nothing complicated. Drywall is a paper-faced gypsum board. You’re filling a hole and resurfacing it.
The basic process for a small hole (under 1.5 inches):
- Lightly sand the edges of the hole to clean them up.
- Apply a strip of self-adhesive mesh tape over the hole (the cheap kind from a hardware store works fine).
- Cover the patch with joint compound (“mud”) using a 4-inch putty knife — thin layers, not thick.
- Let it dry (1-2 hours).
- Sand smooth, apply a second thin coat if needed.
- Sand again, prime, paint to match the wall.
For larger holes (up to 6 inches): Buy a “drywall patch kit” — a metal-framed mesh patch you stick over the hole, then mud over. Same process, takes one extra step.
Time: Active work is 20-30 minutes; total time is a few hours including drying.
Tools needed: A 4-inch putty knife, sandpaper (120 and 220 grit), a paint brush. Total under $15.
This is one of the most useful skills you can learn as a homeowner. Drywall problems are constant, and the fix is almost embarrassingly simple.
4. Replacing a Light Switch
Why it matters: Light switches wear out. They get scratched. They get repainted. The ones that came with the house are often cheap-builder-grade switches that feel terrible. Replacing one is the entry point to basic electrical confidence.
Important warning: Do this only if you’re comfortable working with electrical components, and always turn off the breaker for that circuit before you touch anything. If you’ve never done electrical work and feel uncertain, skip this one and call an electrician — it’s not worth the risk.
What’s actually involved: Most light switches are wired with two or three wires: a hot wire (typically black), a neutral or load wire (also typically black, sometimes red), and a ground wire (green or bare copper). You unscrew the old switch, transfer the wires to the new one in the same configuration, and screw it back in.
The basic process:
- Turn off the breaker controlling that switch. Test by trying the switch — light should not turn on.
- Remove the cover plate (one screw) and the switch (two screws).
- Pull the switch out carefully — the wires are still attached.
- Note exactly which wire goes to which terminal before disconnecting (take a phone photo).
- Disconnect each wire from the old switch and reconnect to the same position on the new switch.
- Push the switch back into the box, screw it in, replace the cover.
- Turn the breaker back on and test.
Time: 20-30 minutes once you understand the process.
Tools needed: A screwdriver, possibly wire strippers, and the new switch (usually $3-15).
This one feels intimidating but is genuinely simple, provided you’re disciplined about turning off the breaker first. When in doubt, hire an electrician — it’s never embarrassing to err on the side of safety.
5. Fixing a Squeaky or Sticking Door
Why it matters: Doors that squeak, stick, or don’t close right are one of the most common household annoyances. Almost nobody calls a handyman for this, but most homeowners just live with it for years.
What’s usually wrong:
- Squeaky hinge: Hinge is dry. Solution: a few drops of any household lubricant.
- Sticking door: Hinges have settled, frame has shifted, or paint has built up over time.
- Door not closing: Strike plate (the metal piece on the frame) is misaligned with the latch.
The basic process:
For a squeaky hinge: Open the door, drip a few drops of lubricant (3-in-1 oil, WD-40, even cooking oil in a pinch) into the top of each hinge. Open and close the door several times to work it in. Done.
For a sticking door: Look at where the door rubs against the frame. If it’s the top edge, the upper hinges have probably loosened — tighten the screws. If the screws spin in place (stripped), replace them with longer screws (2.5″) that bite into the framing behind the trim. If the door rubs the bottom or side, you may need to plane (shave) the edge slightly with a small wood plane or sander.
For a door that won’t latch: Check whether the latch and the hole in the strike plate line up. If not, you can either move the strike plate (easier) or file the strike plate hole slightly larger (5-minute job).
Time: 5-30 minutes depending on the issue.
Tools needed: A screwdriver, lubricant, occasionally a file or sandpaper.
What These Five Have in Common
Notice the pattern: every one of these is mechanical, not magical. Nothing in your house works on principles you don’t understand. A faucet washer wears out. A toilet flapper degrades. A wall has a hole. A switch fails. A hinge dries out.
The reason most homeowners don’t fix these things isn’t lack of ability. It’s lack of having seen someone else do it. The first time, it feels like a foreign language. The second time, you wonder what you were ever afraid of.
These five skills, between them, will save the average homeowner somewhere between $400 and $1,200 per year, depending on how many problems come up. Over a thirty-year stay in a home, that’s tens of thousands of dollars in repair calls avoided — money that stays in your family rather than going to someone else.
Where to Start
Pick the easiest one — almost certainly the squeaky door — and do it this weekend. Five minutes, a drop of oil, and you have your first repair under your belt.
Then watch a YouTube video on the next one. Then the next.
In a year, you’ll have done all five at least once, and the next time something breaks in your house, your first instinct will be to walk over and look at it — not to pick up the phone.
That’s the shift that matters. The tools and techniques are simple. The mindset is everything.
Prepared Family Press publishes practical guides for American homeowners. We believe basic household competence is one of the highest-value skills a person can develop — and that the entry point is much smaller than most people realize.